


snare drum technique - a baseline approach to playing the snare drum
Overview
This article will present a baseline approach to playing the snare drum. I will not go into the mechanics of actually playing the drum - this is partially covered in the drumming mechanics article and will be covered further in the future. Instead, this article will focus on the positioning of the arms, hands, fingers, and sticks. The positions will be explained in a simple manner that should be very helpful to beginning and intermediate snare drummers. This article is not meant to be the end-all of snare drum technique, but will simply provide one interpretation of a solid approach to playing the snare drum.
Underlying Motivation for this Approach
In the article Drumming Mechanics - A System of Levers, I define a correct technique to be one that allows you to efficiently play a wide range of musical passages at a wide range of dynamics and tempos. Basically, it allows you to play whatever you want without causing fatigue.
To achieve this technique, we must think very carefully about which muscles we are using and why. Do you have veins popping out of your neck when you are playing a fast roll? Does flexing your neck and/or shoulder muscles really allow you play that roll faster? Probably not!
As an analogy, look at a video of world-class sprinters. During a race, their faces usually are flopping all over the place because their face muscles are so relaxed. They have trained themselves to focus every ounce of energy into the muscles propelling them down the track - straining the face and neck muscles is wasted energy. We must think about snare drumming the same way sprinters think about running.
Before we get started, let me state some assumptions:
The snare drum is positioned such that the head is horizontal to the ground. I have never seriously played snare with the drum at an
angle, so I am not qualified to explain such a technique.
The player is playing traditional grip. If this is not the case, take everything I say for the right hand and apply it for the left hand.
The drum is being carried with a standard style carrier used by most modern drum and bugle corps.
Ok, let's get started already!
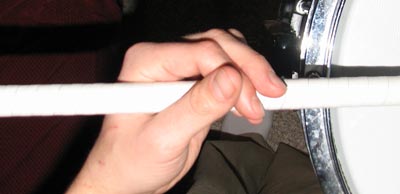
Right Arm:
The right arm should be positioned as shown in the following image.
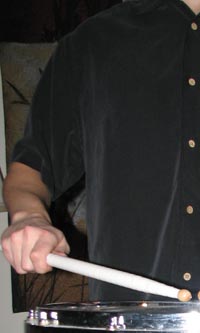
Some things to note: The right shoulder is held up, but not so high as to cause tension in the shoulder and neck muscles. The elbow is held away from the body, but not so far as to cause tension in the shoulder muscle. Some lines have their players crank their right elbows way out away from their bodies in what I like to call the 'chicken wing' style. I personally do not prefer this technique. Keeping the arm slightly away from the body will allow you to keep the wrist in a comfortable, mobile playing orientation.
Right wrist / hand:
While in the playing position (sticks out, not playing) the right hand should be in-line with the axis of the forearm, NOT angled down or up.

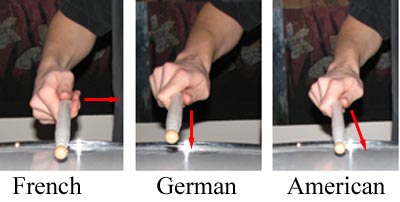
The palm of the right hand should be angled slightly in, perhaps at a 20-30 degree angle. This is somewhere between a German grip (palm straight down) and a French grip (palm straight sideways) and is often called the American grip. I find this slight rotation away from German grip allows a more natural wrist position while still allowing the wrist and fingers to do plenty of work.
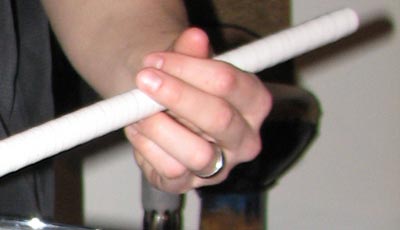
Right Fingers:
The right fingers should grip the stick such that the stick follows the pads of each finger. See the below image.
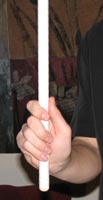
A couple more points: Usually, the thumb is held such that there is no gap between thumb and the hand. This creates a very 'clean' looking technique that is still very functional
Left Arm
The left arm should be positioned as shown in the following image.
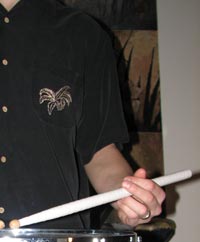
Some things to note: The left shoulder is held such that it is even with the right shoulder. It is very easy to drop the left shoulder in an effort to get more "rotation" on the left traditional grip - don't do it! The elbow should be held about a fist width away from your body. The forearm position will depend on the height of the snare drum. I would prefer if the forearm were angled down slightly below horizontal. If you are in a snare line that sets all the drum heights the same regardless of the players' heights, the drum height should be chosen so that the average forearm position is slightly below horizontal.
Left wrist / hand:
The left wrist should be positioned directly inline with the axis of the forearm as shown. When in the playing position, the palm of the left hand should be facing straight to the right.

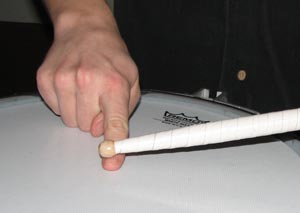
Left Fingers:
The pad of your Thumb and the side of the pointer finger's first knuckle should meet to form a "T" as shown.
The middle finger should be relaxed and resting slightly over the stick. Some people straighten the middle finger on the left hand, but I think this technique is less than optimal. Remember to think of the sprinters! When your hand is completely relaxed, the fingers will naturally be slightly curled. It requires the use of muscles to straighten the fingers. I do not believe that straightening the middle finger serves any purpose to enhance our drumming, so it is therefore a waste of energy.
The ring and pinky fingers should also be naturally curled. Position the fingers such that the stick rests on the cuticle of the ring finger.
If you have not built up a callous in this area on your ring finger, you may experience some growing pains. Keep on trucking - eventually the pain will go away.
Torso positioning:
It is very important to have good posture when carrying a snare drum. This means keeping your back straight so that the weight of the drum is transferred safely through the spine. If you slouch, you are putting a lot of stress on your back which can lead to injury. Even though it might FEEL good to slouch, don't do it! If you practice correct posture all of the time, your back muscles will develop and carrying the drum will become second nature.
I have been taught to use a slight forward lean while carrying a snare drum. When I say lean, I do NOT mean bending at the waist! Keep your back aligned with the lower part of your body and shift your entire weight forward (picture a ski jumper). A good approximation for the amount of forward lean can be found as follows: Start by leaning all the way back until you almost fall over. Then lean all the way forward until you almost fall over. Go about 1/3 of the way from falling forward towards falling backwards - this is your ideal amount of lean. I like this forward lean approach for a couple of reasons:
1) It looks aggressive and gives you stage presence.
2) It allows you to keep most of your weight over the balls of your feet which is very useful for direction changes while marching.
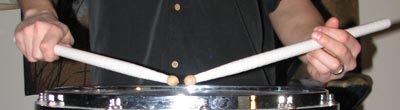
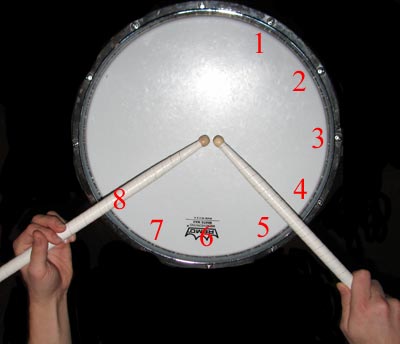
Stick Playing position:
The beads of the sticks should be centered in the middle of the head. The space between the left and right beads should be kept as small as possible, but not so small that you are constantly hitting your sticks together.
The beads should be held approximately one pointer finger thickness above the surface of the head. By keeping the beads very close to the head, we are always ready to play a note at any volume. We can play a grace note by starting at the playing position, or we can raise the bead in preparation to play a tap or an accent.
3) The sticks should be angled down slightly to form a wide 'v' shape when viewed from the front. This angle is very important for sound quality. With most sticks, as you increase the stick angle you will be playing with a smaller and smaller area of the bead. As you do this, you will hear that the sound quality continually gets thinner and thinner.
An easy method for defining this angle is to place two fingers between the rim and the shoulder of each stick while maintaining the correct bead height.

When viewed from above, the right stick should be between the 4 and 5 O'clock lugs and the left stick should be above the 8 O'clock lug. This is how I naturally position my sticks, but I know there will be some variation (especially in the left hand) in how a snare snareline defines their 'correct' stick angles.
Summary:
Hopefully this article has provided a practical method for defining arm, wrist, hand, finger, and stick positioning for playing the snare drum. I think that it is essential to define this information at the very beginning of each marching season so that every player is on the same exact page. Good luck, and keep practicing!